Modifying this section of a ship's main page is optional and should not
be attempted unless you have the correct information.
Most ships will keep the same name, designation and hull number for their entire history.
Sometimes, however, ships are given a new name and / or designation and hull number -
possibly even more than once. It is important to list all of a ship's incarnations since
you may find postmarks or covers for each of them.
To add a ship's designation history to its main page, do the following:
First you need to display the Test Ship Index Page. Right click on the link and open it in a new window or tab.
Click on the link for the ship you are working on in order to display its main page. In the tutorial, we are using SHIP2 but you should click on the link for the ship you are working on.
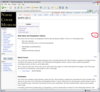
On the ship's main page, click the "[edit]" link at the far right of the line with "Ship Name and Designation History". This will display only that section in edit mode.
<< Image showing the link to edit just the "Ship Name and Designation History" section of the ship's main page.
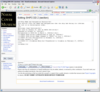
<< Image showing the Ship Name and Designation History section in edit mode.
Look for the following line:
<ol>
This marks the start of the ordered (numbered) list.
Immediately below this line is a line to enter the ship's class:
Ship class (optional)<br/>
This line is optional. If you do not know the ship's class, just erase this line. Otherwise, replace this line
with the name of the ship's class. Make sure to end the line with a <br/> for proper line spacing.
Next is a line for entering information or dates from before the ship was commissioned:
Information and dates prior to commissioning (optional)<br/><br/>
Copy this line as many times as you need and replace it with such information as keel laying date, launch date, etc.
This part is optional so if you do not have any information to place here, just erase this line.
Make sure to end each line with a single <br/> for proper line spacing. For the last line, use two <br/> tags
so that a blank line is left before the next part.
Now, look for:
<li>SHIP NAME and DESIGNATION<br/>DATES<br/>
Additional information (optional)<br/><br/>
Copy and paste these lines as many times as necessary in order to have one for each of the ship's incarnations
from the time it was first commissioned until the end of its life. This includes transfers to foreign navies.
For example, let's say SHIP2 has the following history:
Class name is Hurricane
Keel laid on January 14, 2001 as SHIPA DDX-101
Launched on October 22, 2003
On March 2, 2004 its designation and hull number changed to DDGX-101
Commissioned on June 19, 2004
On July 7, 2006 its name changed to SHIP2 (designation and hull number did not change)
On December 21, 2006 its designation changed to DD-2
On February 17, 2007 it was transferred to the Columbian Navy and renamed DIEGO D-4
You will need one line for the class, three lines for pre-commission information (keel laying, launching,
and designation change), and a total of four lines for the various incarnations starting at commissioning
and listed in chronological order (ie, the ship's current name and designation is always last).
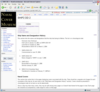
Don't forget to add the correct prefix ("USS", "USNS", etc).
<< Image showing all the lines filled in.
Preview the changes and then save them.
<< Image showing the ship's main page after the changes are saved.