With so many naval covers, cachets, and postmarks in existence, there is no way one person can scan them all. The Museum must be, and was therefore designed to be, a collaborative effort. Allowing registered users to upload images of naval covers, cachets, and postmarks is the single greatest ability of the Museum. In essense, it is its lifeblood.
This tutorial will cover the various aspects of uploading a file into the Museum: scanning requirements, file naming convention, the upload process, and the image tag.
Although we try to keep a flexible attitude and not nitpick, there are two basic rules that we tend to be a bit huffy about: the size of the image when displayed on a web page; the size of the image file in kilobytes (KB). We prefer not to have wildly varying sizes when images are displayed on the page (ie, we do not want one image to be 3 inches by 5 inches and the next image to be so large that you have to scroll top/bottom and left/right just to see it all. We would rather have some uniformity. As for file size, it is easy to make image files that are in the megabyte range but the Museum does not have unlimited storage space. You can get good image quality with only 50 to 150 KB. Occasional images up to 250 KB are OK but anything above that is just too large and wastes too much space.
When you first get started with the Museum, the Curator will work with you to get your image and file sizes within expectation. This may take a few tries before the correct scanner settings are found but, once done, you won't need to worry about it anymore. Scanned images should be clear and legible, in jpg or png format.
There are three basic types of images that are common in the Museum:
Full size image of the Front and / or back of a cover
Scale should be at 100%, resolution (pixels per inch) should be 75 to 100. This should produce a good size image that does not take up much disk space.
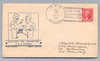
<< Click the thumbnail to see a sample full size image of the front of a cover.
<< Click the thumbnail to see a sample full size image of the back of a cover.
Closeup image of a cachet
Scale should be at 300% (ie, three times normal size). Leave resolution at 75 to 100 pixels per inch. The point of the closeup is so you can see the small details and read the fine print.
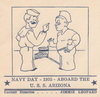
<< Click the thumbnail to see a sample closeup image of the cachet of a cover.
Closeup image of a postmark
Use the same settings as with a closeup of a cachet.
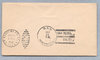
<< Click the thumbnail to see a sample closeup image of the postmark of a cover.
DO NOT UPLOAD AN IMAGE THAT DOES NOT BELONG TO YOU UNLESS YOU HAVE THE OWNER'S PERMISSION.
File Naming Convention
Note that your image file will have either one or two names. The first name is the name you gave it when you saved the scanned image to your hard disk (this is the "source" name). The second name is the name you will give it when you upload the image to the Museum (this is the "destination" name). There are two important rules regarding the destination name:
The destination name must not already exist in the Museum
If the destination name is already in use and you try to upload another image to that name, you will receive an error message and you must give your image a different destination name. This means that once you upload an image, nobody except the Curator can replace it or delete it. Not even you! If you need to replace or delete an image, contact the Curator.
To avoid name collisions and to help identify image files, we ask that you use the following naming convention for the destination name:
<SHIP_NAME> is the name of the ship, location, or whatever name best describes the image
<DESIGNATION_and_HULL_NUMBER> is the ship's designation and hull number, if applicable
<DATE> is the date associated with the image in YYYYMMDD format
<SUFFIX> is an additional suffix number needed to make the name unique (just in case you have already uploaded an image for the given ship with the given date
<TYPE> is either "Front", "Back", "Postmark", "Cachet", or some other word that describes the image.
Yes, it is a bit involved but since there are potentially tens of thousands of covers that might be uploaded, we need some way to prevent name collisions. It also has the benefit of giving a reasonable description of the image and who contributed it just by looking at the file name.
For example, if your Museum userid is XYZZY, the image is the front of a Naval Cover related to the USS Enterprise CV-6, and has a postmark date of December 25, 1940, then the recommended name would be:
XYZZY_Enterprise_CV6_19401225_1_Front.jpg
If you then upload the image with the back of the cover, then the recommended name would be:
XYZZY_Enterprise_CV6_19401225_1_Back.jpg
If you upload another image of a Naval Cover related to the USS Enterprise CV-6 that also has a postmark date of December 25, 1940, then just increment the suffix value:
XYZZY_Enterprise_CV6_19401225_2_Front.jpg
If you upload a closeup of the postmark on the cover, then use "_Postmark" as the <TYPE>:
XYZZY_Enterprise_CV6_19401225_2_Postmark.jpg
If you upload a closeup of the cachet on the cover, then use "_Cachet" as the <TYPE>:
XYZZY_Enterprise_CV6_19401225_2_Cachet.jpg
File Upload Process
Once you have a scanned image saved on your local hard disk, you can upload it into the Museum. There are two basic approaches to uploading files:
Upload the image first and then update a Museum page to reference that image
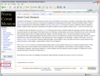
In the left hand navigation bar, click the link called "Upload file". It should be in the "toolbox" section beneath the search bar.
<< Image showing the "Upload file" link in the navigation bar.
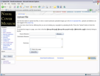
The "Upload file" page is displayed.
<< Image showing the "Upload file" page
The page has three text boxes for you to enter the source file name, destination file name, and a summary to describe what the image is. As mentioned earlier, the source file is the name of the image file on your hard disk. Use the Browse button to find and select the file.
<< Image showing the "Upload file" source file selection
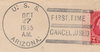
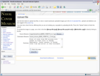
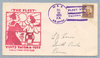
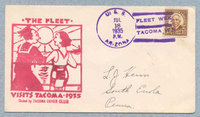
The destination name is the name that the image file will have in the Museum. This name must follow the file naming convention described earlier. For the tutorial, we will upload a sample image of the front of a cover from the USS Arizona BB-39 with a postmark dated July 18, 1935. We will use "Tutorial" as our user name and assume this is the first cover we are uploading from USS Arizona having that postmark date. Therefore, following the naming convention, the destination file name is: Tutorial_Arizona_BB39_19350718_1_Front.jpg.
The summary is optional but strongly recommended so others will have an idea of what the image is and if it has any special characteristics you want them to know about.
<< Image showing the "Upload file" page will all sections filled in
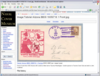
When you have filled in all the information, click the "Upload file" button at the bottom of the page. A new page will be displayed showing the uploaded imaged. Notice that the name of this page is the same as the destination file name. This is important! You need to remember this name because it is what you use in another Museum page to reference and display this image.
<< Image showing the page with the uploaded file.
To display a thumbnail of this image in a Museum web page, use an image tag (described below) with the destination name / page name of the uploaded image. For example, the following image tag:
[[image:Tutorial_Arizona_BB39_19350718_1_Front.jpg | thumb | 100px]]
will produce this thumbnail image:
Clicking on the thumbnail image will display the full size image.
Update a Museum page to reference an image and then upload the image
This method for uploading an image is slightly easier.
Update a Museum page and add an image tag. Most likely, the image tag will be part of a template that you cut and pasted into the page and all you have to do is modify the <image page name> portion. See the Image Tag section below for more information on the format of an image tag.
<< Image showing an image tag in a Museum page that is in edit mode.
Go ahead and save the page even though the image has not been uploaded yet. Instead of the thumbnail image, you will see a link to the image page name.
<< Image showing the Museum page with the image links.
Click on the link and the image page will be displayed. However, there is no image (since you haven't uploaded it yet) so all it says is that no file with that name exists. The nice thing is that it also gives you a link to the "Upload file" page so that you can easily start the upload process.
<< Image showing the image page with the upload link
Click the upload link and the "Upload file" page is displayed. From here, the process is the same as described with the other upload method. The one nice thing is that the destination file name is already filled in for you so all you have to do is use the Browse button to find the file on your hard disk and then fill in the summary section. Less typing, less chance for error.
<< Image showing the Museum page after both images were uploaded.
Note: After uploading an image, you can easily return to the Museum page that references it. At the bottom of the image page, there is a section called "Links" which lists all the Museum pages that reference the image page. Use the link to go back to the Museum page.
Image Tag
To display an image in a Museum web page, you use the image tag. Typically, when adding covers for a ship or cachet maker, you will just cut and paste a template that already includes image tags so it is rare that you will have to create one from scratch. However, it is worth knowing the basics. Here is the format for the image tag most commonly used by the Museum:
[[image:<image page name> | thumb | <width in pixels>px]]
Where:
<image page name> is the image's destination name - which is also the name of the page containing the uploaded image.
<width in pixels> is the width of the thumbnail image in pixels. Typically we use a value of 100px or 200px. In most cases, this value is already set for you by the template and you should not change it.
This style of image tag will create a thumbnail image on the page. If the user clicks on the thumbnail image, they will be taken to the page showing the full size image. For example:
[[image:Tutorial_Arizona_BB39_19350718_1_Front.jpg | thumb | 100px]]
will produce this thumbnail image:
[[image:Tutorial_Arizona_BB39_19350718_1_Front.jpg | thumb | 200px]]
will produce this thumbnail image:
Both examples are thumbnails pointing to the same full size image. Clicking on either thumbnail image will display the page with the full size image.